E17 | Suburban Victorian | Foot Traffic
Season 47 Episode 17 | 23m 42sVideo has Closed Captions
New floors, brick patio, and tile transform a Suburban Victorian renovation in Needham.
In Needham, Kevin O'Connor reviews porch prep with Mauro Henrique, then Jenn Nawada and Mark McCullough build a brick paver patio. Kevin visits a local mill to see rift-and-quartered white oak flooring made for the project. Back at the house, he joins Charlie Silva to weave salvaged Douglas fir boards into the hallway and new linen closet so the second-floor floors look seamless.
Problems playing video? | Closed Captioning Feedback
Problems playing video? | Closed Captioning Feedback
Funding for THIS OLD HOUSE is provided by The Home Depot and Renewal By Andersen.
Support provided by:

E17 | Suburban Victorian | Foot Traffic
Season 47 Episode 17 | 23m 42sVideo has Closed Captions
In Needham, Kevin O'Connor reviews porch prep with Mauro Henrique, then Jenn Nawada and Mark McCullough build a brick paver patio. Kevin visits a local mill to see rift-and-quartered white oak flooring made for the project. Back at the house, he joins Charlie Silva to weave salvaged Douglas fir boards into the hallway and new linen closet so the second-floor floors look seamless.
Problems playing video? | Closed Captioning Feedback
How to Watch This Old House
This Old House is available to stream on pbs.org and the free PBS App, available on iPhone, Apple TV, Android TV, Android smartphones, Amazon Fire TV, Amazon Fire Tablet, Roku, Samsung Smart TV, and Vizio.
Keep Exploring


This Old House Insider Newsletter
Get This Old House exclusive stories, tips, and behind-the-scenes information delivered right to your inbox every month.Kevin: Today on "This Old House"... our Needham homeowners are installing brand-new hardwood floors that are being manufactured just 30 miles from the project.
And I've come here to see the process.
Charlie: Upstairs, we're patching old floors with salvage boards, and I'll show you how.
Mark: Building a new patio?
Just another brick on the ground.
♪♪ ♪♪ Man: Ahh.
That's it.
♪♪ ♪♪ ♪♪ Kevin: Hey, there.
Welcome back to "This Old House" and to our project here in chilly Needham, Massachusetts, where for the past few months, we have been working on our old Victorian built in the late 1890s.
At this point of the project, most of the exterior work is complete.
Now, the front porch, it remains pretty much just as is, although you can see that it is all tarped off and, well, I bet you can guess why.
Mauro.
Mauro: Kevin!
Kevin: There you are.
Mauro: Right here.
Kevin: Whoo!
Toasty in here!
Very nice.
Mauro: Nice and warm.
So good for me.
Kevin: So not a lot of exterior painting for you because the siding came pre-painted, right?
Mauro: Absolutely.
The siding came pre-painted.
All the window trim.
But we did paint a few pieces of trim, but most of it came all done.
So don't have much to do on the exterior.
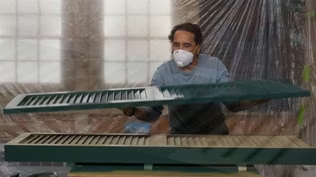
But we do have to paint this whole porch ceiling.
Kevin: Okay.
Mauro: We have a coat of primer.
We're starting to do some preparation wood filler, some caulking on the gaps.
And now we start with the six different colors for the ceiling alone.
Kevin: 1, 2, 3, 4... Mauro: 5, 6.
Kevin: Okay, those are the finalists.
Mauro: Those are the finalists.
Kevin: Does Patrick like one and Liz like the other?
Mauro: Absolutely.
Kevin: I'm a betting man, and I know who's gonna win, but I'm gonna stay out of it.
So they'll make a decision, and you can get that up today.
Mauro: They'll make a decision.
We go to work as soon as I know the colors.
Kevin: Sounds good.
Thank you.
Mauro: Alright.
Thanks, Kevin.
Kevin: Alright.
On the inside of the house today, it is all about flooring.
The entire first floor is getting new hardwood.
And then throughout the rest of the house, we're gonna work with what we've got.
You can see the original flooring here on the stairs.
That stays.
Then upstairs, most of it stays.
In some places, we had to pull some flooring up.
We're gonna put it back down where it's needed.
Let me give you a reminder of our layout.
So the old dining room was moved from the back of the house up here to the front of the house.
That'll be this room.
This little cavity is gonna be for the original china cabinet that will move into this.
And then we go to the open floor plan.
So space is made by taking out the old chimney, which was right here, and then a big, long beam that opened up these two rooms.
So sort of a family room over there.
And then a big, brand-new kitchen here with the pantry behind me.
Now, since we've been here last, the plumbers have finished their rough-ins.
The electricians have just finished today.
Those have been signed off on.
And with the insulation in place, that means that the wallboard can go up.
Those subcontractors are here to do that today.
So while we're very busy on the inside, we're also busy out back because Jenn and Mark have got a project going on in the yard.
Jenn: Alright.
I know it might not look like it, but a lot of work has been done back here prepping for the new space.
Like, remember the rickety, old pergola, the frog pond, the concrete patio?
All gone.
Mark: All gone.
Jenn: The homeowners really wanted a wide, clean, open space.
So we're gonna have all grass that leads up to this patio.
Mark: Alright.
Jenn: So what we did, we excavated down to the subgrade, and then we put in a couple layers of the crusher run.
Mark: Okay.
This is, uh, really some of my favorite material.
And all it is, is stone dust mixed with stone.
It's great for compaction and it's great for drainage.
Jenn: I promise we compacted each layer.
Mark: I know you did.
Jenn: Alright.
Then, for the top layer, we have about an inch of concrete sand.
Mark: Yep.
So again, another great product.
You can see that the aggregate is a little bit bigger than what you might find in, say, brick sand.
Jenn: Right.
Mark: Good for compaction.
Good for drainage.
So if you look behind you, Jenn, you can see the guys are dragging a screed.
Jenn: Right.
Mark: That's the final step before we put the pavers.
You can see those rails that go up each side, that's gonna govern our height.
So when you and I start to put the pavers down, heights are all set and we just fly.
Jenn: Yeah.
The two rails make it all level.
Mark: Exactly.
Jenn: So this is the footprint.
We came out 22 feet from the foundation and 20 feet that way.
Mark: Okay, so what I did after that, Jenn, is I took the foundation and I squared off of that.
So these lines that you see, they're all square and ready to go.
And they came from the foundation.
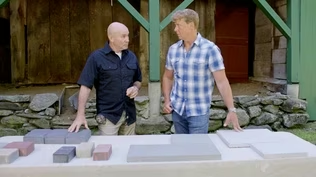
Jenn: Excellent.
Mark: Now, the brick -- a lot of people don't know that a true paver brick, which is this brick, is much bigger than a modular brick.
A modular brick is what a bricklayer would use in a veneer, so in a walk.
But a paver brick is bigger.
It's 8 inches this way, 4 inches that way for a reason.
There are head joints and bed joints in a modular brick.
The paver brick is laid tight, so no joint at all.
So that's why it's a little bit bigger.
Jenn: Right.
And we couldn't use this for the patio and incorporate them together because they're different sizes.
Mark: Exactly.
Jenn: Alright.
So let's talk about layout... Mark: Okay.
Jenn: ...and the pattern we're gonna use.
Mark: So we had a choice of traditional layout, which would be a basket weave or a herringbone or a running bond.
We chose the running bond because sometimes in design that's what it calls for.
Alright, Jenn, can you show me 8 inches towards the driveway?
All this brick needs is just a little bit of a tap.
Jenn: Mm-hmm.
Mark: Alright.
Jenn: And the first brick is always the most important because it's gonna set up the layout.
Mark: Yep.
Again...tap.
And you can throw this in.
So now, Jenn, what I'm gonna do is this is exactly half of a brick.
Jenn: Mm-hmm.
Mark: So I'm gonna put that there, and I'll start my running bond right there.
Jenn: That is a great trick.
Mark: With that one.
Adjust as you go.
This is coming back.
Jenn: Mm-hmm.
Mark: Just like that.
Now we've left space for our half brick.
Jenn: Mm-hmm.
That's the other great thing about this pattern.
Right?
You don't have as many cuts.
Mark: There are gonna be just cuts at the end.
Jenn: Mm-hmm.
Mark: Alright.
So, Jenn, the other characteristic I love about this brick is the color range.
This palette right here probably holds about 15 colors.
Jenn: Yes.
♪♪ ♪♪ Mark: Alright, Jenn, we're making some great progress.
Things are looking good.
Jenn: I agree.
♪♪ Kevin: I am here in Tewksbury, Massachusetts, just 30 miles from our Needham project at a family-owned lumber manufacturer that has been in business for 200 years.
And it's right here that the new hardwood floors for our project are being fabricated.
Sean Herlihy, who heads up sales, is gonna show me the process.
Hey, Sean.
Nice to meet you.
Sean: Hey.
How are you?
Kevin: I'm doing well.
Thank you.
Congratulations on 200 years.
Sean: Thank you very much.
We're very proud of it.
Kevin: Yeah, and a family business of which you're part of.
Sean: I am, I'm sixth-generation member of the family.
Kevin: Wow, that is terrific.
Congrats on that, too.
Sean: Thank you.
Kevin: So this is where the process starts for you guys?
Sean: Yeah.
So we buy from relatively local sawmills, about a 700-mile radius.
We buy it green, so it's fresh off the log, and it ranges in moisture content between 50% and 100%.
Kevin: Okay.
And how much are you bringing in?
Sean: We're bringing in about 5 million board feet a year.
Kevin: That's a big number.
Sean: It's a large number.
You got about 4,000 board feet on this truck.
So we need about five or six of these a day to keep up.
Kevin: Holy mackerel.
Alright.
Sean: The next part of the process is we go into the stacking machine to put sticks between each board to create the airflow.
The sticks we use are a fluted stick.
So a couple of things here.
We're trying to create less touch points on the wood to prevent the staining.
So the lumber can only touch here and here.
You've got airflow here.
Kevin: Yeah.
Sean: When it's down on the board, the board sits flat on that.
And you're gonna minimize the staining.
And this is really where the most important part of our quality control is this.
If the board's not flat, we can't make a good end product out of it.
So however they dry is how they're gonna be.
Once the board gets the memory of being flat, you're all set.
If it gets the memory of not being flat, we're in trouble.
Kevin: Okay.
And so how long are they sticked, air drying, before they end up in a kiln?
Sean: Approximately one to three weeks.
Kevin: One to three weeks.
Sean: So we're trying to get a lot of the same things in the kiln at the same time.
Kevin: Alright.
Sean: So, Kevin, we dry almost all the wood that we sell.
We have nine kilns, about 500,000 square feet worth of space if you add them all up.
Kevin: Yeah.
Sean: The fuel process starts here.
We use all our waste, all our drops, our edgings and our sawdust, and we create a low-pressure steam.
Kevin, this is one of our kilns here, where we're drying some one-inch red oak.
Kiln-drying process varies greatly by the specie and then also the thickness of the specie.
One-inch poplar takes about a week to dry.
Two-inch red oak takes six months.
Kevin: Six months?
Sean: A long time.
Kevin: At what temperature?
Sean: So we usually start around 90 to 100 degrees.
And we'll get as high as 180 degrees, depending on the specie.
Kevin: Can we peek inside?
Sean: Absolutely.
Kevin: This isn't one of those really hot ones, is it?
Sean: No, we just started, so it's in that 100-degree range.
Kevin: Alright.
Lead on.
After you.
And... Oh, yeah.
Yeah.
Well, the first thing I noticed is the steam.
I would have thought that would be separate.
Sean: I know, and you'd think we'd be adding the steam to the process, but we're not.
That's the moisture coming off the wood.
Kevin: So that's not the steam you're using to heat it.
Sean: Not at all.
That's a contained steam.
This steam is from the moisture leaving the wood.
Kevin: It's coming off of the wood.
Sean: It's giving off the wood and creating the steam.
Kevin: You're trying to lower the water content in the wood.
How low are you trying to go?
Sean: So red oak, when we get it in green like we saw earlier, it's about 50% water.
We want to get it down to 6% to 8%.
So how we monitor that is we cut a sample the day we're loading the kiln.
We number each sample.
And then what we do is we weigh it every day so we know what percentage of moisture is still left in the board.
Kevin: So there's a correlation between the weight of this and the percentage of moisture... Sean: Absolutely.
Kevin: ...for a board this size.
Sean: Absolutely.
And each board would be unique depending on its size.
After we take the wood out of the kiln, we load it onto this line here where we're removing anything that's happened in the kiln that hurts the quality.
Could be some staining, some warping.
Kevin: So this is ready to go to the mill?
Sean: It's ready to go.
Kevin: A lot noisier over here.
So the headsets are gonna help us.
Sean: That's for sure.
Kevin: And is this the material that's actually going to our house?
Sean: It is.
Kevin: Alright.
Sean: Rift and quartered white oak mix.
It's gonna be fed one board at a time through the ripsaw.
So it's gonna rip either edge.
Kevin: Yeah.
Sean: And then also, um, if the board is wide enough, we'd rip another one down the middle.
So you try to get either one or two pieces depending on the width of the board.
So we're trying to get it to two and three quarters width.
So it's a two and a half overall for the floor if you include the tongue.
A two and a quarter face.
Kevin: Alright.
And, uh, still very thick, full dimension.
Sean: It is.
It won't get processed to the finished dimension of three quarters of an inch until it goes to the molder.
In this station, we're gonna put in the groove, the tongue, the back-out, and then the surface.
So there's six different cutter heads, two for the bottom, two for the top and one for each side.
Kevin: And you said back-outs.
So that's these two subtle grooves right here.
Why do you do that?
Sean: That's to relieve the stress.
You run a floor a little offset.
So there's more wood above the tongue than below the tongue.
Kevin: Yeah.
Sean: So you relieve the stress in the back with the back-out.
And it also does is it leaves three or four sandings before the floor needs to be replaced.
Kevin: Which is why these beautiful floors can last so long.
Sean: You get a lifetime out of your floor.
Kevin: And when that's all said and done, they come together... whew, nice, beautiful fit right there.
That's never gonna open up.
Sean: So, Kevin, here we are at the final stage of the machining process.
Here is the end matching station.
This is where we're gonna put the tongue and grooves on the ends.
And most importantly, this is where we're gonna cut out any defects that we know the homeowner won't like.
So we're gonna take a knot like this, and we're gonna put a crayon mark in front of it and a crayon mark behind it.
So then the computer knows to chop here, chop there, put a tongue and groove on that piece, put a tongue and groove on this piece, and that piece will go into our wood waste system to help dry the next batch of lumber.
Kevin: Alright.
And so he's just gonna keep feeding it through.
Sean: Keep feeding it through.
Kevin: Okay.
And so that comes out the other side.
And it's got the end matching done.
So how long until this order is ready to get to our place?
Sean: We'll have this done by the end of the day.
But when it gets to the house, it's got to acclimate for 7 to 10 days.
Kevin: So we should take it off the bundles, put it in the house, or maybe even the room where it's gonna get laid and leave it there.
Sean: Absolutely.
You want it to get used to where it's gonna spend the rest of its life.
Kevin: Beautiful.
Well, listen, I cannot thank you and your guys enough.
This is beautiful stuff.
Cannot wait to get it into our house.
Sean: Thank you very much.
♪♪ ♪♪ ♪♪ Hey, Mike.
Good to see you again.
Mike: Nice seeing you.
Kevin: So you're starting to lay the tile down for us in the house.
And you started with our combo mudroom-half bath.
What'd they pick?
Mike: They picked this 12x24 porcelain tile, and they wanted to lay this in a herringbone diagonal pattern.
Kevin: So porcelain.
You must be seeing a lot of this because this has just taken over, right?
Mike: Tons.
Absolutely.
Yeah.
It's indestructible.
It's gonna wear really nice.
Cats, dogs, whatever you got going on, you won't have the scratches and stuff you will have in natural marble or anything like that.
Kevin: Okay.
So perfect for a hard-working mudroom.
Mike: Absolutely.
Less grout as well, too, the size of this tile.
Kevin: So the bigger the tile, obviously the fewer grout lines.
We like that.
Mike: Yep.
Kevin: And now you say herringbone.
So that's that distinctive look, right?
So on the diagonal, sort of offset right there.
Mike: Correct.
This is dry laid.
What we did was we took the center of the space.
We snapped a chalk line straight down.
And then we also took this room into consideration because it's flowing through.
Kevin: So mudroom here, half bath here.
Mike: Half bath here, but same floor and same pattern coming right through.
So we centered the toilet area as well.
So we have a center line here and a center line here.
Kevin: So as I look at your center line in the mudroom in terms of its width right there, and if I were to continue with that across a tile you've already laid, I would say you missed it, because I would be thinking that that center line would end up either at this point here or this little intersection right there.
Mike: Right.
And you'd be correct if it was a square tile.
If it was a square tile, a 12x12, you'd go from tip to tip on that red line.
But in this case, it's a 12x24 herringbone diagonal.
And a lot of professionals miss this.
The center line is actually from point to point, and it's basically the center of that space, which is what starts on the red line.
Kevin: So if you hit that basically 6-inch center mark, go 45 from there.
Mike: That's the proper way.
And you'll see two equal pieces when it's all said and done.
Kevin: So that gives you the equal cuts.
Does it give you that sort of visual center?
Like, that's not gonna screw me up?
Mike: It will once it's all put in place because we're looking at the chalk line now.
That's what's fooling us.
But actually this tile on the diagonal is centered in the space based on that line.
So you'll have equal cuts on both sides.
So it'll make sense when it's done.
Kevin: Well, that's why you're the tile installer and I'm not.
Alright.
Mike: Exactly.
Kevin: Well, we'll let you get back to it, but we'll check in on you a little bit, too.
Mike: Perfect.
Kevin: Nice to see you.
Later.
♪♪ ♪♪ ♪♪ ♪♪ New white oak flooring is starting to go down on the first floor.
Already looks good, Charlie.
Charlie: It does.
Kevin: Up on the second floor, though, we're sticking with the original.
And this is a different species, right?
Charlie: Yeah.
This is a Douglas fir and it's on the entire second floor in all the bedrooms, and those are not being touched.
So we always knew that we'd have some patching to do.
So we saved as much as we could of the original Douglas fir in which we did.
So we have more than enough to do this entire hallway right here.
Kevin: Okay, but not enough of the old stuff because we added, what, 200 square feet of new space up here?
Charlie: That's right.
Not even close.
Kevin: Okay.
Charlie: This is a linen closet that was, you know, extra space that we gained, and the homeowners want the flooring to run right into it, not having any thresholds because the original flooring has thresholds in all the bedrooms.
And they don't want that three quarter lift going into it.
Kevin: I mean, I get why now it's more work because you could have just put a threshold flush there.
Charlie: That's right.
Kevin: But now you can't.
Charlie: Yeah.
So we're gonna take the floor and we're gonna cut these pieces back.
So if we were to take it and cut it this line here, then the new piece could run all the way in through.
You could also say, "Alright, I'm gonna cut it here, here and do a stepping pattern right through."
But I don't think that's gonna look right.
Kevin: No, it's not gonna look good.
Charlie: So what we're gonna do is we're gonna weave them in.
So we're gonna cut this one board back here.
And then the salvage piece would run all the way into this one.
The next piece, we'd cut here.
And then that piece would run all the way in through the linen closet.
We cut it back here again, creating a staggering pattern.
Kevin: Random lengths, no rhyme or reason.
Charlie: Right.
Kevin: Okay.
So I guess now we just have to figure out how you're gonna get the old stuff out, because this is tongue and groove, right?
Charlie: Yeah.
Well, we have a nice little trick for that.
Kevin: Alright.
Charlie: So our first step is to put a square line across this flooring here.
So we're gonna take a nice sharp razor knife here.
Score it nice and -- nice and deep to break the grain.
And we're doing this so we don't have the grain on this piece of floor that's gonna stay pop up on us.
Kevin: Right.
Charlie: So now we're gonna take a chisel and we're gonna put a cut right into that score line.
And the reason we want to do this... ...is because we're gonna take the chisel and go straight down and cut through a little bit deeper.
And if I didn't put this little relief in, the bevel on the chisel, once you're hitting it into the floor, it would be pushed over towards that score line, wanting to lift the grain up on the piece that we're saving.
Kevin: Clever.
Charlie: I'm gonna drive it right down against that cut.
And I'm using my oscillating saw to finish it off.
Alright.
Now we're gonna remove this entire piece.
But we have to also be careful of the edge of the board that we're gonna save.
There we go.
That's perfect.
Kevin: Yeah.
Not bad at all, Charlie.
I mean, you've got that nice groove exposed right there.
Nice right-angle cut right there.
That'll take a new board.
No problem.
Charlie: This board's staying.
So we're gonna go to this one.
We don't want to be too close to this.
But I'd say somewhere around here.
Kevin: So about there?
Charlie: Yeah.
Kevin: Good.
Charlie: Alright.
So now I'm gonna take a Skilsaw.
I'm gonna put a couple of relief cuts roughly in the center of the board the whole way down.
Then we take that section out and then knock both edges into the center.
Now, if it's hung up, we'll use the saw again.
There we go.
Look at that.
Kevin: Oh, yeah.
That's good.
Charlie: And then rinse and repeat all the way through.
Kevin: Look at that.
Perfect.
Charlie: Alright, so here's a sample of our fir flooring.
So the tongue side and the groove side.
But there's no way it's gonna fit in because the boards we took out, we had to put a relief cut down the center of it.
So what we're gonna do is we're gonna take the bottom half of the groove side, and we'll take it right out.
And this one right here, we'll show you.
Kevin: Yeah.
Charlie: So that way the tongue can slip in and drop in place.
Kevin: So that should fit right in there.
Charlie: It should.
Kevin: Oh, look at you.
Okay.
Charlie: Huh?
♪♪ ♪♪ Kevin: So this is gonna be a combination, Charlie, of a little bit of adhesive, maybe some blind nailing and if need be, a little face nailing.
Charlie: Now, these boards are varying width just a little bit.
♪♪ ♪♪ Kevin: Alright.
So that's starting to look good.
Continues into the closet.
And at this point, it's just more of the same, right?
Charlie: It is.
Kevin: Two, three and in.
Charlie: It's gonna look great.
Once this is sanded, it won't look like a patch.
Kevin: Beautiful.
Alright, well, we'll get back to it.
But that's it for now.
So until next time, I'm Kevin O'Connor.
Charlie: And I'm Charlie Silva.
Kevin: For "This Old House" here in Needham.
Kevin: Next time on "This Old House"... Man: I'm working on an upgrade for the homeowner's new primary bath.
To make this one last pass at the vanity here, so you won't have any cold spots.
Kevin: Then, as the locals say, I'm down the cape to see our custom kitchen cabinets made.
Man: And then this is all soft close.
Kevin: Oh, that's beautiful.
Mauro: And I'll show you how to make this kitchen cabinet go from this... to this.
♪♪


- Home and How To

Hit the road in a classic car for a tour through Great Britain with two antiques experts.


Support for PBS provided by:
Funding for THIS OLD HOUSE is provided by The Home Depot and Renewal By Andersen.