E18 | Suburban Victorian | Going Through Customs
Season 47 Episode 18 | 23m 42sVideo has Closed Captions
Heated floors, custom cabinets, and rebuilt bookcases refresh a historic Needham home.
Heath Eastman works alongside tile installer Mike O'Neil to install electric heated floors beneath fresh tile. Kevin O'Connor tours a Cape Cod shop crafting custom kitchen cabinets, meanwhile, Mauro Henrique repaints old cabinets for the butler's pantry. Later, bookcases are rebuilt to hide ductwork and reach the ceiling.
Problems playing video? | Closed Captioning Feedback
Problems playing video? | Closed Captioning Feedback
Funding for THIS OLD HOUSE is provided by The Home Depot and Renewal By Andersen.
Support provided by:

E18 | Suburban Victorian | Going Through Customs
Season 47 Episode 18 | 23m 42sVideo has Closed Captions
Heath Eastman works alongside tile installer Mike O'Neil to install electric heated floors beneath fresh tile. Kevin O'Connor tours a Cape Cod shop crafting custom kitchen cabinets, meanwhile, Mauro Henrique repaints old cabinets for the butler's pantry. Later, bookcases are rebuilt to hide ductwork and reach the ceiling.
Problems playing video? | Closed Captioning Feedback
How to Watch This Old House
This Old House is available to stream on pbs.org and the free PBS App, available on iPhone, Apple TV, Android TV, Android smartphones, Amazon Fire TV, Amazon Fire Tablet, Roku, Samsung Smart TV, and Vizio.
Keep Exploring

This Old House Insider Newsletter
Get This Old House exclusive stories, tips, and behind-the-scenes information delivered right to your inbox every month.Providing Support for PBS.org
Learn Moreabout PBS online sponsorshipKevin: Today on "This Old House"... Heath: I'm working on an upgrade for the homeowner's new primary bath.
Kevin: Then, as the locals say, I'm "down the cape" to see our custom kitchen cabinets made.
Mauro: And I'll show you how to make this kitchen cabinet go from this... ...to this.
♪♪ Kevin: [ Sighs ] That's it.
♪♪ ♪♪ Kevin: Hey there.
I'm Kevin O'Connor, and welcome back to "This Old House," into our project here.
This house was built in the late 1800s.
And now, 130 years later, it is getting a series of upgrades complements of the Silvas.
Hey, Charlie.
Hey, Tommy.
Tom: Hey, Kevin.
How are ya?
Kevin: I'm doing alright.
So, what are you guys working on?
Well, we're all board and plastered, wood floors are in, and now it's time for trim work.
Kevin: Very nice.
I like the sounds of that.
What about you, pops?
Tom: Now, this is the old living room, and now it's going to be changed into a dining room.
Kevin: Yeah.
Tom: And we weren't taking any of these bookcases out, but we had to do some damage to get the ductwork up to the second floor on each side.
And also, the homeowner wants to change the look of the front edge of the shelves, simplify it a little bit.
Kevin: Doesn't like that detail anymore?
Tom: Yeah.
So we'll simplify that.
And then we're gonna make them look like a built-in.
So we're gonna bring it right up to the ceiling, put a crown molding around there and dye it into the wall.
And the same thing over there.
Kevin: Alright.
Well, not a complete rebuild, but actually quite a bit of work.
Tom: Yeah, it's a simple little project, but I think it will make a big difference.
Kevin: Alright.
Sounds good.
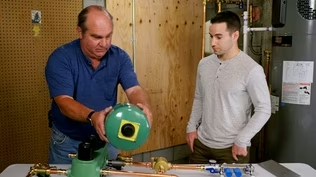
And while all that's going on, upstairs, Heath is actually making an upgrade to our primary bath.
♪♪ Heath: So, I'm here in the primary suite.
And what used to just be a bedroom, a small closet, and an odd carpeted area with two sinks now has his closet, her closet, the toilet closet, and a brand-new primary bathroom.
Now, for the bathroom, the homeowners have chosen to treat themselves to heated floors, so I'm here to meet our tile installer to put the system in.
What's going on, Mike?
How are you?
Mike: Good morning, Heath.
How are you doing?
Heath: Good.
So, you had to do a little bit of prep work before we can get started.
Mike: We did.
We installed the anti-fracture membrane yesterday, which we secured the plywood down, got everything nice and clean, and then cemented down our anti-fracture membrane, which will receive our heat wire.
Heath: Gotcha.
Alright.
So, since your portion is done, we had to do a little prep work ourselves.
So what we did is we installed a new circuit down to the panel so we can choose either 120 or 240 volt depending on the system you chose to install, installed a box similar to this so we have the depth for that thermostat, and then we put a couple of these flexible conduits in so we can pull the sensor and the heat cable back up.
Mike: That's correct.
Heath: So makes it nice and easy in the wall.
And the next step is to start installing the cable.
Mike: Let's do it.
Heath: Alright, Mike.
Now, before we install it, we want to check to make sure the cable's in good shape and not damaged.
So the tag actually has all the information we're looking for on here.
So we have the 120 volt, but we also have that 36.9 ohms as the resistance of this cable, so we want to check that to make sure it's accurate before we install it.
Mike: Yep.
Let's do that.
We're gonna connect these two wires here.
This is a little resistance meter here that will give us -- basically the electricity is going down one wire and coming up the other to let us know that there's no break in the wire.
So let's turn this on.
And right there we have 35.9.
So within reason.
Heath: Within 10%.
Mike: Exactly.
And actually, when this goes in cement, it actually can change and fluctuate a little as well.
So don't get nervous.
We're good.
So, as long as we see in that range, we're good.
Mike: Yeah.
Heath: Alright.
Let's start the install.
Mike: Excellent.
Heath: Alright.
So we're gonna go ahead and put up that first conduit.
And then the second conduit we want to leave for the sensor?
Mike: Yeah, this is the sensor wire which is gonna tell the thermostat when to turn on and off.
Heath: Alright, Mike.
So if you want to feed that in there, I'll go ahead and pull that up.
Mike: Alright.
Sounds good.
Heath: There we go.
And we want to take this just to the point where we have that lead end where it changes over from the wire to the actual heat cable, correct?
Mike: Correct.
Heath: Okay.
Alright, I got it, Mike.
So now we can start clicking this heat cable into the track.
Mike: And we're going to keep it about three pegs right off the baseboard so we're safe we're not too close to the edge.
Heath: And you can go a little tighter if you need to in spots, but if we keep it at three, it keeps a nice even heat through the floor.
Mike: Correct.
Heath: So as we're coming down with our pattern, one of the other things we have to watch out for is you don't want to cross the cables as well, correct?
Mike: Yeah, this heat wire cannot touch at all.
Heath: What happens if they touch?
Mike: It could short out.
Heath: Got it.
That's the last thing you want to do is have a failure under the tile.
Mike: Absolutely.
Only one shot at this.
Heath: There's no easy fix at that point.
Mike: Yeah.
Heath: Alright, so on that side, we have the shower, and we're coming over to the tub.
So we have the line that you marked there.
That's the tub?
Mike: That's the tub base.
Heath: Okay.
Mike: Correct.
So I think we'll make a turn here, and that way if you're stepping out of the tub, you're gonna be on the heated area.
Heath: And you had to get this cable sized roughly for the room, correct?
Mike: Yeah, they make them in 5- to 10-square-foot increments.
Heath: Okay.
Mike: So what we did was we took the length between the tub and the shower and between the wall and the vanity, which was roughly about 8 by 4, which is 32 square feet.
Heath: Sure.
Mike: And then we got a 30-square-foot heat wire, which basically says three peg will get you 30 square ft.
Heath: Got it.
Mike: Yeah.
Heath: So this wire isn't field cuttable, correct?
Mike: Correct.
It comes in those different increment lengths.
Heath: Yeah.
Mike: And you have to fit it to the space.
Just have to make this one last pass at the vanity here, so when you're standing, your feet will definitely be on the heated wire, so you won't have any cold spots.
And we're just gonna make this last turn and tie the end of the wire right here.
Heath: Alright, so now that it's all clipped into place and installed, I want to go ahead and check the resistance again and make sure that we're still at that 35.9 ohms, give or take, that we had before.
Mike: Correct.
Just to be safe.
We should be in that range.
It's supposed to be 36.9.
We're in that 10% range, so we're perfect Heath: Alright, Mike.
So, next we got to install the sensors.
And you actually have two?
Mike: We have two just in case.
A long time ago, some of these could burn out.
Heath: Yeah.
Mike: So it's better just to install two.
Heath: One connects to the thermostat only.
Mike: Correct.
Heath: And if we have an issue, we have the backup.
Mike: That's it.
Good enough?
Heath: Good enough.
Give me a little flag so e can pull that off.
Yep.
Alright.
So, again, if you want to feed that up, I'll pull them up.
Mike: Okay.
Alright.
Heath: Alright.
Yep.
Mike: We're right there.
Heath: Next stop is, where do you want to land these?
Mike: We want to land these in between the heat wire with the three peg, and we never let the white wire touch the blue wire.
Heath: Nothing crosses those?
Mike: Correct.
Heath: Pretty good.
So, a little piece of tape?
Mike: Yep.
Heath: Alright, Mike, so the last part of my install is putting the thermostat in.
I mean, the nice part about this unit is it's nice and digital, easy to see and adjust, but it's also Wi-Fi-enabled so the homeowner can control it from anywhere.
So we're simply gonna install it in that box that we have, make our connections once everything's painted, and I'm done.
But with that, what's left for you?
Mike: Skimming the floor.
And then basically our install, which we're using this tile here... Heath: Oh, nice.
Mike: ...throughout the primary bathroom floor, shower floor, and into the toilet space.
Heath: Great.
And do we have to let this sit for a little bit before we turn this on?
Mike: Um, by the time this floor is done and you come back for finish, everything would be nice and dry and we'll be ready to go.
Heath: Alright, well, I'm gonna let you get to work.
Mike: Perfect.
Thank you so much.
Heath: Alright, thanks.
Appreciate it.
Mike: Nice seeing you.
Kevin: Chatham, Massachusetts -- a quintessential seaside town right on the elbow of Cape Cod, loved by locals and tourists alike, known for its beautiful beaches, its historic lighthouse, and a scenic downtown.
But it's also home to an old-school woodworking shop that is gonna fabricate the cabinets for our Needham project.
Michael.
Kevin.
nice to meet you.
Michael: Nice to meet you as well.
Kevin: Thank you for having us.
I love your little spot down here tucked down in historic Chatham.
Michael: Thank you.
It's been good to us for probably 12, 13 years now.
Kevin: That's how long you've been here?
Michael: Yeah.
Kevin: So that's a shift for you, right?
Because you used to be in general contracting before you got into the custom cabinetry.
Michael: Right.
Correct.
Yeah.
I was in GC for probably 20 years or so, and I realized at some point I was just building the house to get to the interior.
So the opportunity came up to just focus on cabinetry, and that's the move I made.
Kevin: You're a finish guy... Michael: I am.
Kevin: ...turns out.
Michael: I am.
Kevin: So no regrets on that decision.
Never looking back.
Michael: None at all.
Kevin: That's awesome.
Alright.
So, I know you're helping us with the kitchen here.
Um, you guys are sort of soup to nuts, right?
Fully custom, and you take it from the very beginning all the way to install?
Michael: Right, right.
Yeah.
I think of it as four phases, right?
There's the design, fabrication, finish, and installation.
And then if we control all four phases, then we control the quality, we control the cost, and then we control the timing.
Kevin: Alright.
I like to hear it.
So, we've got some designs to look at.
We've seen the kitchen in its rough form... Michael: Right.
Kevin: ...but why don't you walk us through what you settled on?
Michael: Sure.
Kevin: And where did this start?
Are these your drawings?
Michael: Yeah, so these are my drawings.
And then what we do is we work with the owner or the architect, and once we get the details finalized, we can create shop drawings and then build it.
Kevin: Okay, so just roughly, perimeter cabinets, lowers, and uppers.
Looks like a nice big range hood.
Is that wood?
Michael: It is.
Kevin: So you'll fabricate that?
Michael: We are.
Yes.
Kevin: Okay.
And then a big, beautiful island as well.
Michael: Correct.
Kevin: So what are you guys gonna be doing for us today?
Michael: So today we're gonna be milling the rift oak for the island.
And then we're also gonna be doing some face frame work.
And then the range hood is just ready for paint.
Kevin: Alright.
Looks like it all happens right here.
Let's see it.
Michael: It does.
Kevin: So, I see your guys are actually starting with rough lumber.
Michael: So we buy it rough.
That way that we can control it.
We can get a nice flat surface.
We can get everything milled just the way we want it.
Kevin: So first step -- through the planer?
Michael: Yep.
First step through the planer.
We use that to get it to the exact thickness that we want on several passes.
And then of course we're doing the oak island, so really we're just working on face frames.
And then we go to the jointer for a straight edge.
Kevin: And then that straight edge sets you up for success on the table saw.
Michael: Yeah.
And then from there we've got a nice flat board.
It's exactly the thickness we want.
We've got a nice straight edge.
And then we can just rip it down to the widths that we need.
Kevin: And long lengths for you guys.
Michael: Yeah, for this one it is a 10' island.
And so we're gonna have some 10' lengths, typically 11', and we'll cut it down.
And then of course we'll have some shorter stuff for the verticals.
Kevin: Okay, so different material for your boxes for upper and lowers than the island?
Michael: Correct.
Our boxes are gonna be 3/4" thick sides, top, and bottom.
Uh, this is a prefinished maple veneer that we use for the unpainted boxes.
Kevin: And why do you choose prefinished?
Michael: I think it's a better value for the customer.
Kevin: Right.
Michael: And it's a good quality finish, you know, for the interior of a cabinet.
Kevin: I mean, it's a nice, thick, beefy... And it's a great material, as you say, so... Michael: Yeah.
Kevin: That's about as good of a box as you can get, right?
And then face frames on these, just like we'll have, you know, on the island?
Michael: Right.
Kevin: What's your material here?
Michael: So this is a solid maple.
Um, and, again, it's the same process.
You know, we start with that four quarter, you know, we go through the same process to get it exactly where we want it for thickness.
We use pocket screws and glue to put it together.
We find it's a good quality hold.
And then, uh... and then it goes over to the finish side.
Kevin: Boy, that's beautiful.
Michael: So we got two coats of primer and two coats of finish, and then it comes back over to be assembled.
♪♪ ♪♪ Kevin: Alright.
What are you working on now?
Michael: So we're working on this drawer base right here, which is next to the range.
And then here's the elevation of it.
It's about 6' long.
It's this section, and it's a nine-drawer base cabinet.
Kevin: Behind us?
Michael: Yes.
Kevin: Okay.
So again, same process, right?
You're using the maple ply for the box?
Michael: Yep.
Yeah.
Same thing.
And then -- Kevin: Hang on a second.
I'm sorry.
Is this -- Is this one big box or three that you put together?
Michael: Yeah.
No, this is one single box.
And that's one of the advantages to, you know, being able to build custom.
Kevin: Same construction.
We just -- All starting with your maple ply, um, and then your painted maple face frame.
And you guys have already gone and installed the drawer hardware, so your glides are in, which means you're ready for drawers.
Michael: Yeah.
Ready for the boxes.
Kevin: Okay.
Michael: And so this is our typical drawer box.
And this is the clip that holds the drawer box onto the runner.
Kevin: Okay.
Michael: And this is a solid maple box.
Kevin: Yeah.
Michael: And then it's all dovetailed.
Kevin: Beautiful.
Michael: But we don't make these here.
Kevin: You don't?
Michael: No.
You know, you can imagine the amount of time it would take to make all of these dovetail joints.
You know, it's a better value to the customer to outsource these.
Kevin: This detail is terrific as well.
Michael: Yeah.
It is.
Kevin: So this is ready to slide in?
Michael: Sure is.
[ Drawer clicks ] Kevin: And there's the click.
Michael: There it is, yep.
Kevin: As simple as that.
Michael: And then this is all soft-close.
Kevin: Right.
So, this beautiful paint is on the face frame.
Any chance we could see your process for getting this beautiful finish?
Michael: Absolutely.
Yeah.
John's actually just getting ready to start the range hood cabinet.
Alright, so, Kevin, this is the paint side of the shop.
Kevin: Okay.
Michael: And this is John, and he's just doing some touch sanding.
Kevin: And so when all the sanding is done, to the paint process, which is what?
Michael: So, the paint process is primer, sand, primer, sand, finish, sand, and then a finish coat.
Kevin: And you guys do that on site?
Michael: Yeah, we do.
And I think it just helps with quality as well.
Kevin: Yeah.
Alright.
Looking good.
I'm excited to see the finished product.
So thanks for the tour, and we'll see you on installation day.
Michael: Sounds good.
Kevin: Appreciate it, Michael.
Michael: Alright.
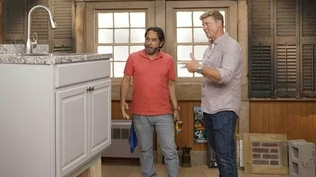
♪♪ ♪♪ ♪♪ Kevin: Behind the kitchen is this butler's pantry, and here they've done two things differently.
In addition to newly built cabinets, they're also gonna be reusing some of the original kitchen cabinets.
You may recall Tommy and I took those off the wall months ago and set them aside.
And instead of white in here, they're going with a green-gray color.
And to get this perfectly matched on the old cabinets, Mauro has set up downstairs.
Hey, Mauro.
Mauro: Hey, Kevin.
Kevin: Love what you did with the place, huh?
Mauro: Like my spray booth?
Kevin: I do.
So, plastic on all the walls.
Little, uh, air handler, drying rack.
Mauro: Nice and clean.
Warm.
Kevin: Yeah.
Mauro: Perfect.
Kevin: So, you always tell us that the prep work is, like, 80% of the effort.
Mauro: Any painting project, 85% is into the prep.
Kevin: These look like they've already been primed.
How'd you do that?
Mauro: Well, here, we cleaned and decreased the whole thing.
And the next step is to lightly sand, so I'm using the 220-grit sandpaper.
And we're just gonna break down this existing finish in order for my primer and top coat to get a good adhesion to it.
Kevin: Okay.
Mauro: Just like that.
Kevin: Yeah.
So once you get those cleaned up again, you will prime these and you'll top coat those?
Mauro: Absolutely.
We're gonna use a bonding primer.
The only thing about this bonding primer is it takes 24 hours to dry.
Kevin: Alright.
I'll get out of your way.
Mauro: Alright.
♪♪ ♪♪ Now that the final cabinet is primed, I will move on to the first coat.
Hold the nozzle 8" to 10" away from the surface you are painting.
Long strokes works best.
The cabinets will need two coats of paint.
Each coat takes about eight hours to dry.
Do the first coat today.
I will do the second coat tomorrow, and the next day they can be installed.
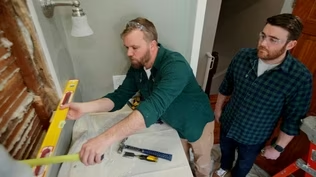
Kevin: We're back working on the built-in bookcases in the dining room, starting with boxing in the new ductwork.
Tom: Alright, so now we want to measure for the side or the length of the box.
Take my square.
I'll put it against the back of the cabinet.
Just take a scrap piece of wood, and measure from out here to here.
It's 7 1/8 to the shot of the miter.
Now we need to get the length of this side to the shot of the miter, so we can use the cabinet top as a reference.
So I'll measure to the face of our cleat.
That's 13 1/16.
I come over here... and I mark 13 1/16.
Put a mark... and I measure from the back of the cabinet out, and that's 7 and... a strong 3/4 of an inch to the back side of the 45-degree angle, 'cause we're going to miter that corner.
Kevin: Okay.
Tom: Alright, so we have both measurements.
Now we can rip our board.
[ Saw whirring ] Alright, so we have our pieces cut... and we're going to assemble it in place because we can't put it together and then try to get it in.
So we'll put some glue on the miter.
Look at you.
Nice job there.
And then we'll just tack it in place with a gun.
[ Power tool whirring ] Alright, so we're gonna close in the soffit at the top there, so the cabinets go all the way to the ceiling.
Charlie put on the fillers to accept this, so put that against it.
That's going to be the piece that closes it in, brings it up to the ceiling.
Kevin: Scribe looks good.
Tom: Alright.
So I also put a mark on that.
How does that miter look?
Kevin: I'm actually a little blocked out.
So let me get you a measurement.
Tom: Take a measurement I've got 11 and 9/16 on the backside of the miter.
Kevin: That's what I got.
Tom: Alright.
I'll cut it.
I'll leave the line on and then we can check it.
[ Saw whirring ] Alright, so I left the line on just a little bit.
You can check this miter.
That miter looks pretty good but now we can put it up there, check it, and see if we have to fine tune it just a little bit.
♪♪ ♪♪ Okay.
So now we're gonna glue up our corner first.
So we'll leave that on that.
♪♪ Kevin: Do one?
Tom: Yep.
Good.
Oop.
Okay.
Good.
You just leave the glue on that joint.
We sand it, and the sawdust from the sanding of the wood will stick to the wet glue and close that joint right up.
Now we'll just put it up against the nailers.
Drop it in.
♪♪ Okay.
That's one.
Alright, let's check this down there and see how it fits against the wall.
Kevin: Off to the side wall's good.
Tom: Okay, now I'm gonna mark the length, so I'll just scribe right across the back.
That'll be the shot to my miter on this corner.
[ Saw whirring ] Alright, so now we're gonna cut the long piece that goes on the front, which means I have to change the angle of my saw, and I have to put this filler back on because this represents my wall.
So I put that back on the saw.
I take my mark right there.
That's the shot on the front.
I'm gonna change the direction of the miter... [ Blows ] ...45 the other way.
♪♪ ♪♪ Now we get a molding.
All built.
Corner is mitered and nailed and glued.
Nail it up to the ceiling.
Into the cabinet.
Alright, so if you see up here, remember there was a damaged part of the cabinet so I put some two-part wood filler in there and mixed it up?
And that's gonna dry in about 20 minutes.
It's almost dry now.
But to fill this transition, to make it nice and smooth, we're gonna use this piece of 1/4 round.
It's gonna fit right in there, miter around the corner, and that will make a nice transition, finish it right off.
Kevin: Okay.
And what's your plan for the shelves?
Tom: Well, the shelves are gonna get changed.
We're gonna use the existing shelves, but we're gonna modify 'em slightly to eliminate some of this detail, this nosing right here, and flatten 'em out.
And here you can see Charlie, he's already cut them off.
So you have a nice plain simple look.
And that's what the homeowner wants.
Kevin: And you just, what, rip that on the table saw?
Charlie: We do.
We use an older blade 'cause we're gonna hit a few nails, but it's worth it.
We're saving the boards.
Kevin: Okay.
So 1/4 round and shelves.
Tom: Yeah.
We're gonna notch these shelves right here around the pipe on this side and that side.
♪♪ ♪♪ ♪♪ ♪♪ ♪♪ ♪♪ Kevin: Alright, Tommy.
So, nice fix and reuse of those bookshelves.
Tom: Not too much work, and you get a completely new look.
Kevin: Alright.
And we're starting to wrap up here, Charlie.
Getting close.
Charlie: Only a few weeks to go.
Kevin: Alright, well, until next time, I'm Kevin O'Connor... Charlie: And I'm Charlie Silva.
Tom: And I'm Tom Silva.
Kevin: ...for "This Old House" here in Needham.
♪♪ Kevin: Next time on "This Old House"... Charlie: We found a new home for this 130-year-old china cabinet.
So we decided to make a wood box to accept the new shelves, put some cleats in and install it.
Perfect.
Kevin: That is nice, Charlie.
Tom: And we'll get this old door ready for some new hardware.
♪♪ Kevin: That's next time.


- Home and How To

Hit the road in a classic car for a tour through Great Britain with two antiques experts.


Support for PBS provided by:
Funding for THIS OLD HOUSE is provided by The Home Depot and Renewal By Andersen.