E22 | Walpole Ranch with ADU | An ADU Takes Shape
Season 47 Episode 22 | 23m 42sVideo has Closed Captions
Kevin demos a wall in the primary bedroom while Tom frames an exterior wall.
Kevin O'Connor helps demo a wall to expand the primary space. Tom Silva works through interior and exterior wall framing details. Richard Trethewey reviews shared utilities and plumbing layout for the Accessory Dwelling Unit, and a new underground electrical service takes shape. Kevin heads to Atlanta to see how different ADUs are designed and built - some even from former free standing garages.
Problems playing video? | Closed Captioning Feedback
Problems playing video? | Closed Captioning Feedback
Funding for THIS OLD HOUSE is provided by The Home Depot and Renewal By Andersen.
Support provided by:

E22 | Walpole Ranch with ADU | An ADU Takes Shape
Season 47 Episode 22 | 23m 42sVideo has Closed Captions
Kevin O'Connor helps demo a wall to expand the primary space. Tom Silva works through interior and exterior wall framing details. Richard Trethewey reviews shared utilities and plumbing layout for the Accessory Dwelling Unit, and a new underground electrical service takes shape. Kevin heads to Atlanta to see how different ADUs are designed and built - some even from former free standing garages.
Problems playing video? | Closed Captioning Feedback
How to Watch This Old House
This Old House is available to stream on pbs.org and the free PBS App, available on iPhone, Apple TV, Android TV, Android smartphones, Amazon Fire TV, Amazon Fire Tablet, Roku, Samsung Smart TV, LG TV, and Vizio.
Keep Exploring

This Old House Insider Newsletter
Get This Old House exclusive stories, tips, and behind-the-scenes information delivered right to your inbox every month.Providing Support for PBS.org
Learn Moreabout PBS online sponsorshipO'Connor: Today on "This Old House"... Tom: We're here in Walpole, and the ADU is all framed, and now we're working on the new addition on the back of the new garage.
Richard: Then, will the ADU share its utilities with the main house?
The answer is on the way.
O'Connor: And I'll head down to Atlanta to see how this southern city has been embracing ADUs since 2017.
♪♪ Person: Ahh.
That's it.
♪♪ ♪♪ ♪♪ O'Connor: Hey, there.
I'm Kevin O'Connor, and welcome back to "This Old House" and to Walpole, Mass, where we are working on this ranch house right here.
It was built in the early '70s, and it's just under 1,300 square feet, and it is currently home to a former active duty military family who spent many years on the road and have finally put down roots here in town so that they could be closer to family.
And they are about to be a lot closer to family.
That's because our homeowner Jill's parents are building an ADU or accessory dwelling unit right in the backyard, and we'll get to that in a minute.
But first, let's talk about what's changed since we were here last.
So this is where the old garage was, and it was never in the original scope of the project.
But because the foundation was not below the frost line, it wasn't up to code.
And to bring it up to code, they determined that it was going to have to be underpinned.
So they figured to save time and money, they would just pour a new foundation, which is what you can see here.
So the new garage is going to go on the old footprint.
Now, behind it, though, this is all new space.
And that's for a laundry room that's going to go right here, a half bath behind it, and then the rest of the space is going to be a proper entryway and mudroom.
And you can see that they started the framing, and Tommy is going to pick this up and continue it.
Now, in the backyard, check this out.
A lot of changes back here.
So obviously this is the original house, but you can see all of the new construction here, the part that Jared, Kevin, and the crew have framed, sheathed, and even put a little bit of trim on.
This addition with the foundation underneath, runs about 65 feet long and about 25 feet wide, but inside, it is separated into three distinct spaces.
Let me show you.
So the first space is going to go right here off of the old house, which you can see is right here.
On the other side of this wall is the current primary bedroom.
So we're going to come through that wall, bring it to right about here, and then that primary bedroom is going to get bigger, have an en suite bath and more closet room.
Now, from here, going into the space about 20 to 22 feet to right here, this is what they're calling the bonus room, just around 500 square feet.
And it's going to be a big open space that's going to be shared by the family in the primary house, as well as by Grandma and Grandpa in the ADU.
And they'll have access to it from two doors, one on this side, one on that side.
Beyond this wall, all of this going to the back of the house, this is going to be the ADU, just under 900 square feet.
And Grandma and Grandpa are going to get one bedroom, two full baths, a laundry room, a living room, and a kitchen.
Pretty sweet space, and they'll also have access to the backyard.
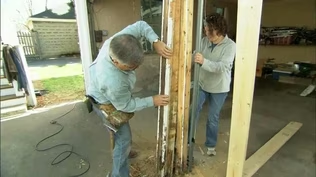
Now, the next thing that we need to do is actually to cut through the old house to connect these two, and I'm going to give our G.C.
Kevin a hand with that.
♪♪ Hey, Kevin.
How are you?
Good to see you.
-Smith: Good to see you.
-O'Connor: Lot of progress -out front.
I love to see it.
-Smith: Yep.
O'Connor: This is the wall that's coming down?
Smith: Yeah, so, we're going to open up this whole wall.
We're going to rip all this off, and we're going to frame the door for the primary closet and then frame for the primary bathroom.
O'Connor: Got it.
Okay.
So it can all go down.
I will give you a hand setting up, and then I'll give you a hand doing the demo.
Smith: Awesome.
Looking forward to it.
O'Connor: Alright.
♪♪ ♪♪ Not protecting the floors.
I presume these are coming out?
Smith: Yeah, so we're taking all the hardwoods throughout the whole house, getting them out of here.
O'Connor: So no need to put plastic down.
Smith: Nope.
Kevin, this place is starting to come together here.
O'Connor: Yeah, you get a sense of what just a little extra room is going to do to make this a real primary suite.
Just get a little more cleaned up, and we're good to go.
Tom: Alright, so you got all the studs cut.
So, Jared, the crew is really making some great progress here.
Jared: Yeah, Tommy.
Carlos and his crew have really been moving along nicely here.
So you can see we got this 2x6 wall we're getting ready to frame here.
This is going to be an exterior wall.
It's going to grab these stairs coming up from the basement, so we're going to have a door here at the top of the stairs.
And then this wall here, we're going to take this two 2x4 wall, and we're going to continue it to tie into the 2x6 wall, 'cause this is going to be an interior wall.
Tom: Mm-hmm.
Yep.
So the interior wall can be 2x4, and for two reasons -- we don't have to worry about the exterior insulation factor, 'cause this will be our exterior wall here.
But we do want to be able to make sure that this wall thickness remains constant all the way across, because this wall is going to go away, and we want to make a nice, flat surface for our new cabinetry to mount to.
And Carlos is over here marking our top and bottom plate stud locations on the 2x6 studs.
But you notice he's taking it from the outside of the wall, because the sheathing is going to go all the way out here, and we want to make sure that it's good practice that the sheathing will end up somewhere with the 16 on center.
So you can see that Carlos has jack studs and our king studs marked for this side of the door to rest of the header on, and two kings here with a jack to rest the header on there.
Make sure everything's together, transfer it, and then we separate these and nail them.
♪♪ ♪♪ Alright, so for the header that's over the doorway to the stairway, it's a 2x6 wall.
To make the wall thickness right, we take the 2x8s, use three of them with two pieces of sheathing filler.
That gives us our 5 1/2 dimension, perfect for what we need.
♪♪ Alright, let's stand this one up.
Make it 85 1/8.
Jared: Great.
Two at 85 1/8.
Tom: You got it.
Jared: Here you go, Tom.
Top and bottom plate, 85 1/8.
Tom: Okay.
Thank you, Jared.
♪♪ Alright, now we can cut our studs and nail them in place.
We'll slide it in place.
♪♪ Alright, now we have this corner all framed.
This is an interior wall, and this is the exterior wall.
We get this wall sheathed, and then we can work on the rest of the framing for the new addition and the back of the garage.
Richard: An important consideration with an ADU are the utilities -- electricity, gas, water, and sewer.
Will they share those utilities?
Will they have to run separate?
And these rules change from state to state, town to town, and they're ever changing, and I'll predict they will change in the future.
But for right now in this town, at this moment, we can share the utilities.
So, here's our water line.
This feeds the main house, will branch and feed the ADU over here.
Here's the sewer.
The existing cast iron sewer goes out to the street.
This is the old drain lines for the old bathroom group above us.
Here's the kitchen sink, and you can see the cast iron, it comes down here.
Some new PVC to outside.
Here's a new bathroom that's off the addition here, and at this point right here is where the ADU drain comes in, and that's where our plumber Bob is working.
I'm glad to see we got a good plumber on duty.
-Hi, Bob.
How are you?
-Bob: Good, Richard, -how you doing?
-Richard: Good.
-What are you working on here?
-Bob: So I am laying out for these two ADU bathrooms right now.
Richard: Okay.
Two baths here.
You got a kitchen, right?
Bob: Yeah.
Drain, waste, and vent.
Richard: Look at you with a tablet and everything.
So I see there's back to back toilets right here.
Two lavs right there and a lav right there.
Bob: Correct.
Richard: Okay.
So are you ready to just drill?
Bob: Now that everything's laid out, I'm going to drill the pilot holes.
But what I'm going to do is I'm going to drop a flag.
Richard: Drop a flag?
Bob: Yeah.
So I take these landscape flags.
Richard: Okay.
This one says lav.
Bob: We drop it through the pilot hole.
Richard: So why do you do that?
Bob: So, I do it because I work alone, and it makes it much easier if I can get all the flags down and then go downstairs to see if I have any hits -or any obstructions.
-Richard: No apprentice?
Bob: No apprentice.
Haven't found the right one yet.
Richard: Really?
They may come along.
I hope so someday.
Alright, so then you drop these down.
Now you'd know exactly where you are in relation to, like, "I" beams or joists.
And once you know you're good to go, then you drill all the holes once in the right spot.
-Bob: Correct.
-Richard: That's pretty smart.
You steal that from somebody?
Bob: No.
Never.
Richard: [ Laughs ] Alright, let's do the pilot holes.
♪♪ Alright.
Down here in the basement here are your flags.
That's the -- Alright, here's the two lavatories here and here.
You didn't hit anything.
I love it.
There.
Toilets, perfect.
This never happens.
Bob: Never happens.
It's a plumber's dream.
Show you over here where it did happen.
Richard: Alright.
Bob: This is our laundry waste over here.
You can see the center of the wall.
Richard: Oh, I see it right there.
Lookit.
The pilot hole came right down through and at the top, too.
So what did you do?
Bob: So I took a measure down here, readjusted upstairs, sent it back down.
Now we know we're good to drill.
Richard: And if you hadn't have done that, you would have drilled right through the top of that engineered lumber, taking every bit to the structure out of it.
-Bob: Correct.
-Richard: I like that.
Alright.
So you've run your main right here.
I love it that it's pitched perfectly.
I even love this.
You've labeled all the branches.
I love it.
Nobody does that, Bobby.
Bob: Not often.
Richard: Alright, so I see a laser level.
How do you use it?
Bob: Yeah.
So I use this laser to set up my centers.
It gives me the center of the water closet upstairs, and it gives me the center mark on this pipe so I can cut my wire in perfectly.
Richard: So let me see if I understand this.
So here's your typical toilet drain size, 3 inch.
So there it is centered.
-And now... -Bob: This 90 goes here.
Richard: Yeah.
So clear.
-We can measure that.
-Bob: Yep.
Richard: And you can measure the long lateral.
It's unbelievable.
Bob: Correct.
Richard: It's like an unpaid apprentice.
I love it.
Bob: It's the best worker I have.
Richard: Well, I'm an old dog, and you taught me some new tricks.
That's pretty good.
Bob: I appreciate it.
Richard: And you are now ready to go so you can drill these holes.
So I'm going to get out of your way.
Good job.
Bob: I appreciate it.
Richard: Thanks, brother.
Bob: Let's get to work.
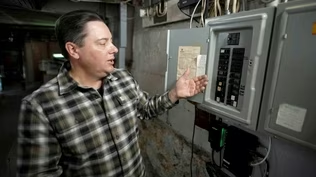
♪♪ O'Connor: The original electrical service was overhead, off of a pole out front, over the driveway to the front corner of the garage.
Well, the old garage came down, so everything was disconnected, giving the homeowners an opportunity to rethink the service.
The new design is to have it come off a pole here in the back of the house, which means we can bury it and bring it to the back corner of the ADU.
And helping us with that is our electrician, Sean Brennan.
-Hey, Sean, good to see you.
-Sean: Kevin, -how you doing today?
-O'Connor: Alright.
So this is a lucky find a pole out back?
Sean: It is.
This was perfect to have a pole on the back side of this house.
O'Connor: So what goes into getting the service changed from overhead out front to underground out back?
Sean: So you have to file a work request form with the utility company basically stating the pole you want to come off of and the size of the service.
And typically there's no issue with that, because they want their customers to be paying their bills.
O'Connor: Alright.
And so what are we bringing in?
Sean: On this case, we went from a 200 amp, used to be overhead.
We're now going a 400 amp for the ADU, so we can actually have two meters here.
O'Connor: So two 200-amp services.
They're going to be separate, so separate utility bills for both houses.
-Sean: That's correct.
-O'Connor: Oh, that's awesome.
It'll look a lot better on the ground.
Sean: Oh, yeah.
O'Connor: So you guys trenched to get that done.
Sean: So we had to lay this trench out, put a base layer of sand, gets it all nice and level so that we really have no void underneath the pipe, make sure it's sitting flat.
O'Connor: How deep's the trench?
Sean: The trench has to be 18 inches down, which is the requirement of the NEC, which is the National Electric Code.
We tell our site guy that we like to be 24, so that our 90-degree sweeps at the pole and at the house will be completely underground.
O'Connor: Alright.
And conduits going in right now?
Sean: Conduits going in right now.
-O'Connor: Can we watch?
-Sean: Absolutely.
O'Connor: Alright.
We're good at watching.
So what is this process, Sean?
Sean: So, that's basically called a PVC hot box, we refer to it in the trade.
And it applies heat to it so that you can make a -- your own bend.
So you heat it outside, you drag it in.
It's pretty floppy, so they got to kind of guide it to make sure that it doesn't kink 'cause you want that pipe to stay round.
So once they glue it, we usually use water to make it cool down quicker, and you got to -- and also so you don't burn your hands, and then form it in the direction we're trying to go.
So typically when we have a bend, we like to work to the bend to make it and then come the other way and join them together.
♪♪ ♪♪ O'Connor: Are you ready to backfill?
Sean: We put down 6 inches of sand on top of these conduits, and then we lay this direct burial tape.
-O'Connor: On top of that.
-Sean: Yeah, just so if anybody's ever digging back here again, hopefully they see this tape before they go too far.
And then once that's done, I call the local wire inspector.
He comes out here.
He checks that 6-inch depth of sand, makes sure the trench is still deep enough, and then we can backfill the whole thing.
O'Connor: Perfect.
Alright.
Well, I appreciate it.
Thanks to you and your guys.
Sean: Appreciate it.
Thanks.
O'Connor: Today I have come to Atlanta.
Like a lot of cities in this country, places like Los Angeles, Austin, Seattle, has an affordable housing crisis.
So in 2017, Atlanta passed a law that allowed for the development of ADUs or accessory dwelling units, little houses on existing residential lots.
Since the law was passed, over 350 have been permitted, and there are more on the way.
So I have come to find out why the city has embraced ADUs and what the residents are building.
Well, thank you for inviting us back.
You guys were great to work with a few years ago on that single family in Atlanta, but now ADUs as a specialty in the firm, that surprises me.
Meg: Yeah, there's been a large demand, so we are handling all of the ADUs that are coming into our company.
O'Connor: So what do they allow you to build?
Meg: Up to 750 square foot, 20 foot in height.
And typically they're detached structures from the primary residence.
O'Connor: Nice.
Okay.
What are you going to show us?
Christina: Well, today we're going to show you four different properties that we've been working on.
We have one that's in the design phase, so we can give you an idea of what's possible.
We're going to show you one that we're in the middle of construction on, one we wrapped last week so you can see it kind of all come together, and then one that we finished a year ago.
O'Connor: A little bit of everything.
Awesome.
-Let's go see.
-Meg: Okay.
This is the primary home, and it is a 1930s bungalow.
And the previous homeowner at some point built this structure.
O'Connor: Oh, yeah.
That's definitely an old building.
So I guess, what, a one-car garage plus something?
And so this has great potential.
-Meg: Absolutely.
-O'Connor: So show me -what's possible.
-Meg: Yeah.
So this is the plan that we've come up with.
O'Connor: Oh, that is a vision.
Meg: Yeah.
Absolutely.
The best part about this is that we're going to be grandfathered in to the lot line setbacks.
And so you'll see on the side yard, it's actually right on the lot line.
And then to the back, it's about 3 feet from the fence.
O'Connor: So that's allowed to stay if you renovate this and don't tear it down.
Meg: We're renovating it.
We're using the existing footprint.
O'Connor: And if a homeowner didn't have the grandfathering, and they wanted to build new, what are the lot line requirements?
Meg: That's a great question.
So it'd have to be 15 feet in from the back, from the rear setback, 7 feet from the side.
So it's actually right here in the center of the yard.
O'Connor: Yeah.
So he does have a real diamond in the rough.
Meg: Yeah, absolutely.
O'Connor: Can I see how rough the rough is?
Wow.
That's gonna have to go.
Meg: Yeah.
O'Connor: This would scare a lot of homeowners.
It's not insulated.
Little block foundation.
Meg: Yeah.
It's nothing to write home about.
O'Connor: Watch your back, cause this is gonna come down hard.
So talk to me about costs and timing.
How long does something like this take, and how much does it cost?
Meg: You sound like a typical homeowner.
Those are like the number one topics we like to talk about.
So, timing, so you can expect 12 months start to finish.
And what that means is the first six months is design and layout and permitting.
The second six months is actual build time.
-O'Connor: Okay.
And cost?
-Meg: Cost.
So you can expect $300 to $350 per square foot for accessory dwelling units.
And at 750 square foot, that's approximately $230,000 to $260,000 depending on your finishes.
O'Connor: Right.
Okay.
And do you know his plan?
Meg: There's currently three plans, A, B, and C. Plan A is to long-term-rent it.
That was his first idea.
Plan B is to mid-term-rent it, and plan C is to actually move into it, rent the primary residence, and maybe travel part of the year and enjoy, you know, life.
O'Connor: Cool.
Alright.
Well, thank you for showing us.
On to the next.
Christina: So you'll notice behind us, that's actually the main house.
And they have an incredible lot here.
-O'Connor: And this is it.
-Christina: And then this is it.
Hiding underneath here is an existing 750-square-foot cement block building.
And we just wrapped it with cement board siding.
O'Connor: Oh, wow.
So you get the favorable setbacks -'cause it's existing.
-Christina: Yep.
O'Connor: But otherwise sort of a blank slate.
-Christina: I can't wait to show you.
-O'Connor: Alright.
Christina: So welcome in to a full-size kitchen here.
There's gonna be a 7-foot island here with seating for four.
Cabinets are currently going in.
Then you'll have the open living concept with a dedicated living space, which is again open to a vaulted ceiling.
Makes it feel a lot bigger.
O'Connor: Oh, it does.
This is below your 20-foot height max?
-Christina: Absolutely, yep.
-O'Connor: But it doesn't add to the square footage.
It's just volume.
Christina: No, so you can go up.
Then we've got room for a full-size washer and dryer here.
Full size HVAC system.
No mini splits.
O'Connor: Oh, so ducted heat and AC.
Christina: Yep.
And then welcome into our first of two bedrooms.
O'Connor: One of two.
Perfect.
Christina: Why don't we go see the finished project?
O'Connor: Yes, please.
Christina: So we'll see the main house here, and then we have the ADU in the back.
This is a new construction here, so we did not get the advantage of a grandfathered-in setback.
So here we're 7 feet from the side and 15 from the back.
O'Connor: Fits in there nicely.
And what's your total square footage here?
Christina: We're hitting right at 550 on this one.
-Come on in -O'Connor: Please.
Lead on.
Christina: So you'll see with a smaller footprint, it is a little tighter in here, but we still get a living area, and then we still get all the appliances in the kitchen, but they're a little bit smaller.
O'Connor: So a smaller refrigerator.
Christina: And then a hot plate instead of the range.
-O'Connor: Yep.
-Christina: And they counteracted the smaller space with these giant ceilings so it doesn't feel as tight.
O'Connor: Full bath in there.
Yeah, the vaulted ceiling really gives it that volume, which is great.
Christina: Yeah, it makes it feel a lot larger.
Let me show you a cool trick that we have here.
This is an all-in-one washer and dryer unit to save space.
O'Connor: Nice.
Christina: And here's a pretty large sized primary.
O'Connor: Oh, yeah.
This is plenty.
Christina: Yeah, we're getting a closet here and a workspace.
O'Connor: Very nice.
And, I mean, high ceilings in here, even though I presume the upper loft is above us.
Christina: Yeah, there's a loft right above us, but these are still 10-foot ceiling height in this bedroom.
O'Connor: Let's check out the loft.
Christina: So this is where we're going to pay for that 10-foot ceiling height in a higher stair rise.
O'Connor: Yeah.
You're not kidding.
That's a big step.
How is that even legal?
Christina: ADU's actually have their own stair code.
O'Connor: Oh, okay.
So this one works even if it is steep.
Oh, this is tasty up here, huh?
Big vaulted space, a second bedroom.
Very nice.
So how do they use this space?
Is this a rental?
Christina: Yeah.
So they actually opened this up as a short-term rental.
And even though you see we're just finishing, they've already had two renters in.
O'Connor: Well, it's very well appointed.
Nicely done.
Christina: I'm going to send you off to see Meg and our last finished one.
O'Connor: Oh, my.
Meg: Welcome to the city of Decatur.
O'Connor: Wow.
You saved the best for last.
Meg: For sure.
Yeah.
This is stunning, isn't it?
O'Connor: Yeah, it is.
And so different city, different rules?
Meg: Absolutely.
So you can actually go up to 1,000 square foot here, up to 24 foot in height for two stories, and 10-foot setbacks.
O'Connor: Okay.
And how much of that 1,000 square feet did you guys avail yourselves?
Meg: We did 525 square foot, and it has a sleeping loft up above.
O'Connor: Oh, I love the door.
That's nice.
Meg: Yeah.
O'Connor: Oh, I like the space, too.
Meg: Welcome into the living area.
You can see that we have a nice, big entertaining center with the 15-foot ceilings.
O'Connor: Big upper window to let in the light.
Meg: Really gives a nice light, airy feeling, doesn't it?
O'Connor: Sure does.
Meg: And then we have a full size eat-in kitchen, so lots of spaces to sit, and then a little hidden storage under here.
O'Connor: Never a wasted inch.
Tucked in underneath the stairs, which is great.
Meg: Yeah.
So the stairs bring me to a nice next topic.
This is another ship's ladder, but because we only have 7.5-foot ceilings, the rise is not as high as the last one.
-Let's head up.
-O'Connor: Let's try.
Oh, yeah.
Big step up, but not as much as the last one.
-Meg: Mm-hmm.
-O'Connor: Another great loft.
So how do the homeowners use this?
Meg: For a pool house in the summer.
In the off season, they do a rental.
O'Connor: Be nice to come back to a place like this.
-Meg: I think you're welcome.
-O'Connor: Well, I mean, I cannot thank you enough, Meg, and Christina, too.
Beautiful places, and, quite honestly, a lot of ideas to bring back to Boston.
-So thank you.
-Meg: I can't wait to see.
O'Connor: Yeah.
♪♪ ♪♪ O'Connor: Next time on "This Old House"... Zack: I'm back in town to install the most popular siding -in the country.
-Jared: I think one of the big factors, Zack, was the maintenance.
They want a low maintenance product that they're not going to have to worry about painting every 4 or 5 years.
Richard: Then, fitting HVAC into any building is always a challenge, but we're going to show you a solution that tucks right up in between the ceiling joists.
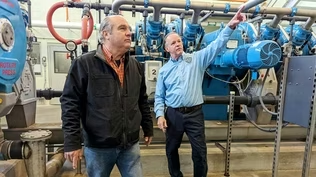
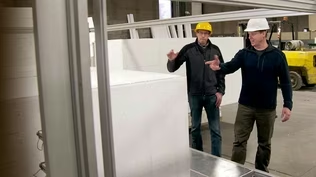
Zack: Inside this factory, we'll see how a building comes together from a pile of wood to a structure ready to roll down the road.
O'Connor: That's next time.


- Home and How To

Hit the road in a classic car for a tour through Great Britain with two antiques experts.


Support for PBS provided by:
Funding for THIS OLD HOUSE is provided by The Home Depot and Renewal By Andersen.