E25 | Picnic Table; Insurance Policies | Ask This Old House
Season 24 Episode 25 | 23m 42sVideo has Closed Captions
Outdoor movie night tech; basics of homeowners' insurance; how to build a picnic table.
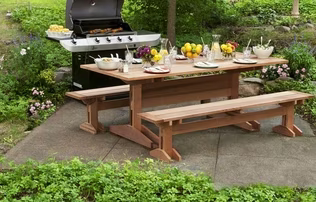
Ross Trethewey shares the perfect tech setup for an outdoor movie night, including a projector and screen, a solar battery bank, portable and outdoor-rated speakers, and smart Wi-Fi plugs. Kevin O'Connor talks with an insurance expert to break down the basics of a homeowner's insurance policy. Then, Tom Silva and Kevin team up to rebuild a picnic table they first built 17 years ago.
Problems playing video? | Closed Captioning Feedback
Problems playing video? | Closed Captioning Feedback
Funding for Ask This Old House is provided by The Home Depot, Renewal By Andersen, and ChipDrop.
Support provided by:


E25 | Picnic Table; Insurance Policies | Ask This Old House
Season 24 Episode 25 | 23m 42sVideo has Closed Captions
Ross Trethewey shares the perfect tech setup for an outdoor movie night, including a projector and screen, a solar battery bank, portable and outdoor-rated speakers, and smart Wi-Fi plugs. Kevin O'Connor talks with an insurance expert to break down the basics of a homeowner's insurance policy. Then, Tom Silva and Kevin team up to rebuild a picnic table they first built 17 years ago.
Problems playing video? | Closed Captioning Feedback
How to Watch Ask This Old House
Ask This Old House is available to stream on pbs.org and the free PBS App, available on iPhone, Apple TV, Android TV, Android smartphones, Amazon Fire TV, Amazon Fire Tablet, Roku, Samsung Smart TV, LG TV, and Vizio.
Keep Exploring


This Old House Insider Newsletter
Get This Old House exclusive stories, tips, and behind-the-scenes information delivered right to your inbox every month.Providing Support for PBS.org
Learn Moreabout PBS online sponsorship[ Dramatic music plays ] ♪♪ Kevin: On "Ask This Old House," our experts travel across the country to answer questions about your house.
♪♪ Today, Ross talked about some products that will elevate your outdoor movie night.
Then, do you have questions about your home's insurance policy?
We have an expert on hand to help explain what you should have and what you may not need.
And Tommy revisits an old project when he rebuilds the picnic table at the barn.
♪♪ All that on "Ask This Old House."
[ Mid-tempo music plays ] Kevin: Hey, Ross.
Ross: Hey.
How's it going, Kevin?
Kevin: Alright.
Can we get the football game on?
I like to watch it outside.
Ross: We're going there next.
Let's go to football.
Kevin: So, what'd you bring us?
Ross: We got all this outdoor entertainment now.
So we got different devices that do different things, and they're getting better over time.
Kevin: My outdoor patio is the favorite room in the house because of some of this stuff.
Ross: Me too.
Kevin: Alright.
So what are we looking at?
Ross: So, first thing is a projector, right?
So the ideas of hanging a TV on the wall outside, that's gonna be an outdoor-rated, that's now starting to change.
So there are now projectors that can be used inside, but, also, outside.
And they can project to a screen or the side of the house and give you a really good image, a really good resolution that come a long way.
Kevin: So that's what I'm looking at right here.
Look at that handsome face right there.
Ross: Look at that guy.
Kevin: Nice, big display.
Ross: The other thing, too, about these is that they connect through Bluetooth and Wi-Fi.
So you can actually pull in, you know, data from your phone.
You can also pull it and connect it to smart-home platforms.
Kevin: So if I have this as a standalone, you're telling me that I can have it talk to either, like, my cable system or whatever my, you know, video or TV-watching habits are, goes through that?
Ross: That's right.
Yep.
It can all get pulled through that, through Bluetooth or through Wi-Fi.
Kevin: Okay.
Ross: So got a Wi-Fi connection, like, nearby your house, absolutely pull it right through.
Kevin: Right.
And obviously, indoors, that's the plugin.
But, then, sort of the portable version is what you got us here.
Ross: That's right, yeah.
Lithium-ion battery bank.
It's basically a large power bank.
So you got your 120-volt plugs here, you've got your USB here, and then you also have your 12-volt D.C.
right there.
But we also have the ability to connect it to solar, right?
So, we have an input over here so I can have a roll-out solar panel.
I could plug it into that and basically recharge that.
So especially if I'm camping, RV, anything like that, I can recharge that battery bank while the sun is shining.
Kevin: Very nice.
I'm looking at a digital reader right here sort of telling me where I am.
Give me a sense of how much power or time comes out of this for, let's say, your projector.
Ross: Yeah.
So this is about 1,000 watt-hours of battery stored on 100% battery level.
And this right here runs about 90 watts of power.
So I could run this projector for over 10 hours on this battery bank, fully charged.
Kevin: Plenty of time.
We'll both be asleep halfway through the movie.
Ross: That's right.
Kevin: Good deal.
Alright.
Ross: So, you also have smart outdoor plugs.
So, this could plug into a receptacle, and it's gonna give you two outlets here.
This is also weatherproof.
And it gives you the ability to control these from your phone.
So I could set schedules.
I could run the projector, you know, off of this one.
I could run my Christmas lights off of that one.
I can set that scheduling so it only runs that outlet when I want it to.
Kevin: Super handy to have.
Keep the bistro lights on, the Christmas lights.
I love that sentiment.
Ross: That's right, that's right.
Kevin: We're talking sound with these?
Ross: Yeah.
So, we got two different speakers here.
So if you want, this has a builtin speaker, but if you really want to enhance that sound for an outdoor movie, as an example, you could go with a portable unit, like this.
So this is gonna be docked inside, but, then, you can bring it outside, and you can connect it through Bluetooth or through Wi-Fi to your device -- in this case, the projector.
So you can actually get the audio feed coming off of that.
Kevin: So, docked inside meaning sort of that's how it's charging?
Ross: Yep.
Grab it, bring it outside, drop it in, and then basically connect it, and then you're gonna have nice sound coming out of that.
Kevin: Very nice.
Ross: And then you also have a more permanent outdoor speaker.
So, this is a permanent unit that can be mounted outside.
It's wired.
And, so, these come with different kind of form factors in terms of the IP rating.
So, IP is ingress protection, and so basically is how waterproof and dustproof are the units?
Kevin: How much does it stop the ingress of water or dust?
Ross: That's right.
So, this is IP-66.
Kevin: Yeah.
Ross: So that's really good on dust and really good on water, meaning I can hose that thing down and it'd be fine.
Kevin: Okay.
Ross: And this one's got 56, so a little bit less on dust, but still I could hose that down with water and still be fine.
Kevin: So do the two numbers mean different things?
Ross: Yeah.
Kevin: So when you say 66, that first number is for dust?
Ross: That's right.
Yep.
First number's for dust, and that's from 0 to 6.
And the second number is for water, and that's from 0 to 9.
Kevin: D'oh!
[ Laughs ] Ross: Yeah.
I know.
Don't get me going on -- Kevin: Either way, that's fine.
Ross: But one of the things you want to be careful of, any outdoor piece of equipment, is what is the IP rating, right?
Kevin: Yeah.
Ross: And those two numbers there do matter.
And the other thing, too, is making sure that it's got UV resistance, 'cause you don't want that plastic to degrade over time with sunlight hitting it.
Kevin: 'Cause the expectation is that's sitting outside 24/7.
Ross: That's permanent.
That's right.
Mounted on the side of your house, as an example.
Kevin: Good to know.
I'll be over on Sunday, 2:00.
Alright.
Ross: Football game.
Kevin: Thank you, Ross.
Ross: Let's do it.
[ Mid-tempo music plays ] ♪♪ Kevin: Angela, thank you for joining us.
It's not always that we have a licensed insurance agent with us here, but I'm glad we do.
Angela: Oh, thank you Kevin.
Thank you for having me.
Kevin: Yeah, sure.
We're always working on the house, but we probably don't think as much about protecting as we should.
So that's why you're here.
Just help us in big picture thinking about homeowners insurance.
Angela: Sure.
So, a homeowner's insurance policy is broken into two sections.
Kevin: Okay.
Angela: We have the property section, and we have the liability section.
Kevin: Alright.
Let's talk property.
Angela: Yeah.
So, within property, we have four sections.
We have our dwelling, which is the house.
We have other structures, which is anything not attached to the house, so like a detached garage, a shed, a fence.
Kevin: Okay.
Angela: We have personal property.
So that's everything inside the house.
So if we take the house, flip it upside down, it's going to be everything that kind of shakes out.
Kevin: Yeah.
Alright.
So the built-in bookcase, no, part of the house, but the books that fall out, personal property.
Angela: You got it.
Yeah.
Kevin: Okay.
Angela: Yeah.
And then we have loss of use.
So that comes in if we are displaced from our home 'cause of a big claim, we can't stay in the home because of, you know, something that had happened, and now we're forced into a hotel or an apartment for an extended period of time.
This loss of use covers those over and above expenses.
Kevin: Got that.
Okay.
So that's property.
You mentioned that liability is the other category.
Which is what?
Angela: Yeah.
So liability, we have two sections there.
We have personal liability which you're going to see those coverage amounts be much larger.
You're going to see, like, either a $500,000 limit or, like, $1 million limit.
And that's because if, yeah, if you are found negligible for personal injury or for property damage or bodily injury and you get sued, that's gonna kind of take care of that.
Kevin: So the number's big because we might be getting sued?
Angela: Yeah, legal fees and all of that.
Right.
Kevin: Okay.
Angela: And then we have medical payments, which you're going to see a much smaller amount.
Now, you're going to see about maybe like $5,000 in coverage there.
That's somebody gets hurt in your home, that you're not at fault.
So this is like a no-fault coverage.
Maybe they have their shoelaces are untied, they fall down the stairs, and you just say to them, "It's okay.
Just go to the hospital, take care of it."
Kevin: So this isn't my medical expense.
It's anyone's medical expense who gets hurt on my property.
Angela: Yes, yes.
Yeah.
Kevin: Okay.
So property liability.
Angela: Yeah.
Kevin: There's got to be things that are not covered in the standard package.
Angela: Yeah.
Kevin: Because I'm always worried about what don't I have in terms of coverage.
Angela: Yeah, for sure, as you should be.
Right?
Kevin: Yeah.
Angela: So, there are standard policies that cover things like wind and storm and all of that.
But, then, if we want to add on to it, we can, and we do that through adding coverages.
And we call that endorsements.
Kevin: Okay.
What's an endorsement?
Like, what's an example of an endorsement?
Angela: Yeah.
So, an example would be, like here in New England, we have many homes that are heated by oil.
Kevin: I got one, a tank in the basement.
Angela: Yeah.
So you have the oil tank in the basement.
If oil were to seep out of that, to drip out of that oil tank and seep onto the basement floor, that would be a huge cleanup, a huge environmental -- Yeah.
Kevin: So I can add an endorsement to my homeowner's specifically for that tank and that cleanup?
Angela: Yes.
And that would be called an escaped fuel remediation endorsement.
Kevin: It even sounds expensive.
Angela: Yeah.
It's not that expensive.
Kevin: But I can see why that would be specific to, like, us here in New England.
But folks, like, in California might not use a lot of home heating oil.
Use with propane or something else.
Angela: Right.
But in California, folks might want earthquake coverage, right?
So they might be able to add that onto their homeowner's insurance policy by endorsement, or they may be able to purchase a separate earthquake policy.
Kevin: Okay.
So, I distinctly remember when my wife and I, when we got engaged and married, we put her jewelry, a wedding ring and engagement ring, I think on the homeowner's policy, right?
Angela: Yeah, you probably did.
And you can do that.
You can add jewelry onto the homeowner's insurance policy through an endorsement.
But we don't recommend that.
We recommend putting it on a separate jewelry policy.
And the reason for that is if you had to put a claimant on the jewelry and it was on the homeowner's insurance policy, that claim would trigger an increase on your homeowner's insurance policy.
Kevin: Oh.
Angela: Yeah.
So keeping it off and on its own policy, if you have to put a claim on it, it's not going to affect -- Yeah.
Kevin: Don't let the tail wag the dog.
Angela: Yeah, yeah.
Kevin: I get it.
I'll check that one.
Angela: Yeah.
Check that one.
Kevin: And, then, you listen to the news, and people are always surprised that their house gets washed away or flooded or whatever, and they say they don't have coverage.
And I'm thinking, "Well, it's a damage to the dwelling."
Angela: Sure.
Yeah.
Kevin: Right?
So is a flood not covered by the property?
Angela: It's not.
So if that's going to be, like, weather-related water coming into the house from outside, maybe it comes in through the floors, through the doorways and everything, that's water seepage, weather-related that's not going to be covered under standard homeowner's insurance policy.
You need to purchase a separate flood-insurance policy for that kind of coverage, yeah.
Kevin: Okay.
That's good.
So if my pipes break in the house and I say, "Oh, my God.
It flooded my kitchen," that's a whole different thing.
Angela: That's covered.
Yep.
But, now, if you have water backup in the basement maybe from a sewer pipe that's clogged or what have you and that backs up in the basement, you might not have coverage for it without an endorsement, water-backup endorsement.
Kevin: Okay.
Angela: Yeah.
Kevin: Lots to think about.
Angela: Lots to think about.
Kevin: If I'm now wondering if I'm properly covered, what do I do?
Do I call my insurance company, ask them, or do I go to a third party and say, "Hey, can you review it for me?"
Angela: You can do both, Kevin.
Start with your agent, get your policy, go over it with them, and then have it checked by somebody else, as well.
Absolutely.
Kevin: Alright.
What are you doing tonight?
[ Both laugh ] Thank you, Angela.
I appreciate it.
Angela: Thank you, Kevin.
Kevin: Good information.
[ Mid-tempo music plays ] ♪♪ Hey, Tommy.
Tom: Hey, Kevin.
How are you?
Kevin: I'm doing all right.
Look at you, huh?
Tom: You recognize this?
Kevin: I do.
Holy smokes.
How long ago did we build this?
Tom: I bet it's been 15 or 16 years anyway.
Kevin: Wow.
You look good.
[ Both laugh ] Tom: I feel good.
Kevin: Yeah, better than the table.
Yeah, it's got a little worse for the wear.
Although I'm surprised it isn't even worse than it is.
Tom: I am too.
I mean, this is conventional lumber, KD -- kiln-dried.
Kevin: Yeah.
Tom: Didn't stain it, didn't paint it, didn't do anything.
The legs held up really great because they're pressure-treated.
Kevin: Right.
Tom: I wouldn't want to use pressure-treated lumber where you're gonna eat off of, at least for the first 3 or 4 months, until it dries out.
So, I mean, KD lumber.
For what it is, it held up great.
Kevin: Yeah.
Two-thirds of the boards are alright.
And, obviously, some of it a little worse for the wear.
Tom: Yeah.
Kevin: So what do you think?
You want to make a new one?
Tom: I think we need to.
[ Both laugh ] Kevin: Spend a lot of time eating at this table, so we should.
Tom: Yeah, yeah.
Kevin: Same design, or do you want to mix it up?
Tom: We could change it if we want.
I mean, it's pretty basic.
Picnic table is a picnic table.
We can use a simple tool.
We can use a circular saw, a square, and maybe a speed square, and build the whole thing.
Kevin: All right, well, I'm in.
Tom: All right.
We're going to start by working on the top.
We've taken all the 2x8s and put the best side down, the worst side up, because we're obviously going to see that when we flip it over.
Kevin: Mm-hmm.
And then putting them together, what are you thinking?
Tom: Well, I made a 2x4 cleat right here.
And there are going to be three of them, gonna go like that.
And basically bevel the edge right here, so when you sit at the table, you won't have a sharp edge that could hit you or side or your knee when you jump in.
So, the first thing I want to do is, I want to find the center of this.
These are 8-foot-long 2x8s.
So I'll measure into the center.
I'll pick 48 1/4 because these are actually long.
I'll divide this 2x4 in half, which is 3 1/2.
So I go inch and three-quarters on each side of the line, 3 1/2 and 3 1/2.
That will give me the location for our 2x4 to go on.
Draw a line across.
Kevin: Ooh.
Big reach.
Tom: [ Laughs ] So now we know the location for our centerpiece.
The end down here was going to have one.
It's going to be about 16 inches in.
We're going to use an exterior construction adhesive.
And the nice thing about the construction adhesive, it actually activates a little better and faster because the wood is damp or wet.
The screws that we're using are actually framing screws used inside or outside.
They're self-drilling.
There's a tip on it that cores the hole out.
They have a nice coarse thread that really grabs the wood nicely.
[ Drills whirring ] All right.
Now we'll just straighten and square up the end with the track saw.
Beautiful.
All right, now we're ready to start making up our legs, our A-frame, to support the table and the bench.
We want the table to be 30 inches high, overall.
So establishing the angle for the legs, a good rule of thumb is 20 to 30 degrees.
In between those numbers.
The higher the number, like 30, the wider the stance for the leg, which gives it more support.
Kevin: Right.
Tom: So let's say you have four people sitting on this table and you had a leg that was in pretty straight.
There's a pretty good chance that this table is going to tip over.
Kevin: Yeah, yeah, yeah.
Tom: All right?
So you have it wide.
It gives the stance so that you can sit there.
So let me show you.
If I do -- This is 28 degrees.
Kevin: And how do you know that?
Tom: Well, I checked it with my square.
It's about 28 degrees right there.
Kevin: Show it right there.
Tom: Yep.
And just to show you the difference in the angle, this is 25 degrees, and it's going to give me the same height of the table, but the degree changes with the legs.
So you can see the angle there.
And this is 20 degrees.
So now you see that the legs are completely different.
Now the other thing you really have to think about is the front edge of the seat and the edge of the top.
You want to be able to get in and out of the table comfortably and sit there for a long period of time comfortably, so you don't want the edge of the seat flush with the edge of the top.
This is about 4 inches.
That's a nice number.
If it's in like that, then you're sitting -- you've just made the space to get in and out smaller, and it's harder to get out.
Kevin: Okay.
Tom: Now, the other thing that we're going to do, also, is I want to make our new bench seat wider.
I'm going to use the 2x8s.
So we're going to take two 2x8s, and that's going to establish the length that we need.
If I put my 2x8s tightly together, because they're wet, and I send a tape measure over to you and you hook it on the outside edge, and I measure from outside to outside, I have 74 3/4 of an inch.
That would be the length of our center A-frame support.
But we don't want it to come all the way out.
We want to have a slight overhang.
In other words, keep it recessed in a half an inch on each side or even an inch.
So, 74 3/4 -- if I take off 2 inches, that would be 72 3/5.
Kevin: And so, what are you thinking, in terms of angle for the legs?
Do you want to stick with 28, or you want to mix it up just so we can sort of see how you calculate everything?
Tom: Let's go from 28 to 25.
Kevin: Okay.
Let's do that.
Okay, pops, one 25-degree angle, please.
Tom: Okay.
So, we're gonna do 25-degree angle on the bottom of the leg, and to get the 25-degree angle, we're gonna use a speed square.
So I'll slide it over, pivot, hold it tight, and come over to 25 degrees right there.
Kevin: Yeah.
Tom: And I mark, right here, my line.
Kevin: Okay.
Tom: All right?
And that's 25 degrees off of 90 right here.
Kevin: Perfect.
I got that.
But you said that we want the table to be 30 inches high, right?
Tom: 30 inches is a nice height for a table.
Kevin: So how do we get 30 inches, you know, when this leg is at an angle, to make sure that it's 30 inches above the ground?
Tom: Right.
So, what we're going to do is, we have the level line on the ground, and we're going to have a level line for the table underneath the top.
Kevin: Okay.
Tom: All right?
So parallel cuts at 25 degrees.
So that means I have to go 90 degrees to give me a plumb line up off of the ground.
Kevin: Okay.
Tom: Okay.
So now if I hold my square on this line right here, and you take your tape measure and you hook it right here and just pull up, now, see the 30?
Now, without pivoting out, I'm going to slide my -- I'm going to slide this out.
Now keep your tape measure parallel with the edge of the framing square.
Just put a mark, a small mark, or an arrow point.
That's to the top of our top.
We have to think about the thickness of the top, which is an inch and a half.
Kevin: Right.
Tom: Okay?
So now you could just come down an inch and a half or, what I would do is, I'm using a framing square, and I know this dimension of the framing square is an inch and a half.
So I would take my framing square, I'd put 30 right there with another little ding.
Kevin: So there's two right there.
And, remarkably, they are an inch and a half apart.
Tom: All right.
So now we know that this and this have to be parallel.
So Speed square come out again.
So now I'm going to take it, I'm going to slide it up, get to my 25 right here.
And now put your mark.
Kevin: So, just so I'm clear, when we cut these, even though that leg's going to be at an angle, the distance from ground to the top, less this thickness, that's going to give us a 30.
Tom: Right.
Because we took it all off of 90 degrees.
Kevin: You've done this before.
Tom: Level and plumb.
Kevin: Okay.
Tom: And we have one more thing we want to do.
The top of the finished bench from the ground is going to be 17 inches.
Kevin: And so that bench is gonna sit on the cross bracing that will attach to these legs.
Tom: And this cross brace is gonna hold everything together and the weight of the people and the seats.
Kevin: So, you want to mark for that?
Tom: We're gonna mark for that.
We're gonna break out our framing square again, and we're going to use our plumb line up.
Kevin: Mm.
Tom: Okay?
Slide it down, because we know we have an inch and a half right here.
Put it on, mark it on the line, exactly on the line, and put a little ding mark.
Okay?
Now we go back to our speed square, we go back to our pivot point, and we go back to our 25.
Slide it up, keep it tight, and mark it.
Kevin: So, this line, the top of our cross bracing.
Tom: Exactly.
Kevin: Which means our bench will sit on top of that.
Tom: And this is the length of our legs.
And we mark it template.
Kevin: Then we can cut.
Tom: And now we can cut.
[ Saw whirring ] ♪♪ ♪♪ I'm going to add two carriage bolts on each leg to stiffen it right up.
♪♪ We got to stiffen this up.
I mean, a lot of people sitting on it.
We want to make sure it stays stiff.
We're going to do that with two boards.
Kevin: I'm square, plumb here.
Tom: Okay.
Don't move it.
We'll do the same thing over here.
♪♪ ♪♪ Put it right down.
♪♪ ♪♪ Kevin: So, I just gave it a light sanding to clean it up a little bit.
Tom: Yeah, looks good.
Kevin: Yeah.
Looks almost identical to the last one.
And nice and sturdy.
Tom: Nice and sturdy.
Subtle changes.
2x8s over 2x6s.
Seat's a little wider, and the legs have a little bit different angle.
Kevin: So, we left the last one unfinished.
What do you think about this one?
Tom: Well, I mean, what'd it last?
15 to 17 years without a finish.
Kevin: Pretty good.
Tom: You could stain it, you could paint it.
If you stain it or paint it, depending on what you use, you might have to redo it every five years.
Kevin: So get a little extra life but a lot more work.
Tom: Exactly.
Kevin: All right.
So, when I see a picnic table, you know, I only think one thing.
Tom: What's that?
Kevin: Beers, burgers, grilling.
You up for it?
Tom: Food, right?
Kevin: Yeah.
Tom: I could have a burger.
Kevin: All right.
Well, listen, if you've got questions about your house, we would love to hear from you, so make sure you keep those questions coming.
And until next time, I'm Kevin O'Connor.
Tom: And I'm Tom Silva.
Kevin: For "Ask This Old House."
Tom: It's a turning apron.
That's not gonna fit you anyways.
♪♪ Kevin: You know what they call a hamburger that's been turned, Tommy, right?
Tom: What?
Kevin: A hot dog.
Tom: [ Laughs ] Kevin: What do you want, hot dog or hamburger?
Tom: Oh, my gosh.
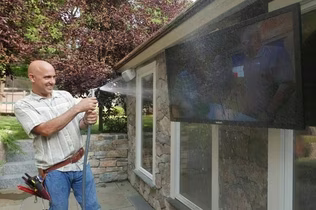
Kevin: Next time on "Ask This Old House"... When a homeowner wants to put a TV outside, Heath provides some guidance on how to properly install the unit.
Woman: Looks incredible.
Kevin: Then, do you have questions on how to start a renovation?
Tommy and Zach give some insights on the do's and don'ts.
Then Mark helps a homeowner redesign their aging fire pit.
Man: Thank you so much.
It's beautiful.
Kevin: All that on "Ask This Old House."


Support for PBS provided by:
Funding for Ask This Old House is provided by The Home Depot, Renewal By Andersen, and ChipDrop.